Sunday, June 7, 2009

Whiskey Plank

Well, we finally got there.  It took a solid month to finish putting up the veneer (4 total layers) and last Wednesday we had a Whiskey Plank. The Whiskey Plank is a boatbuilding tradition in which we drink whiskey when the last plank goes on the boat--pretty self explanatory I guess. In our case, however, we drank whiskey when the last 92 planks were vacuumed to the boat. In that case, it seems you would call it The Whiskey Vacuum Suck?  I'm not sure where the Whiskey Plank originates, but it's a welcome (and rare) opportunity to drink expensive whiskey at work.  

Overall, putting up the veneers was a pretty neat process. But I have to admit that it got to be pretty tedious after about the 4th bag.

On a different note, I'm struggling with the aim of this blog.  I think it might be too technical for most people so I am going to start toning it down quite a bit.  If anyone has technical questions, leave a comment and I'll get back to you.  That said, I am going to try to explain what I've been up to for the last month.

.
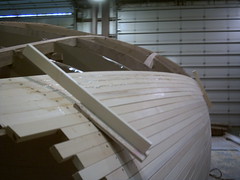
Veneers went on the boat at about 35 to 45 degrees of the strip-planking.

It's a little hard to see but every other plank is overlapping the plank next to it.  Doing this we could cut along the edges of the planks with a razor knife to get a nice fit.


This is the technical part:
After all the planks were cut  and dry fitted to the boat it was time to start getting them down there permanently.  For the first layer we stapled the veneer down the old fashioned way.  The reason for this was to seal the boat up for the vacuum bagging.  (Trying to vacuum on top of the strip-planking would probably have caused terrible leaks because we didn't edge glue the planks together).  We would take off five planks, coat them with epoxy, add thickend microspheres to the hull, and staple away.  Each side required about 20,000 staples to fasten the 90 or so planks down to the hull.


Once the first layer of veneer was stapled down we were ready to start vacuum bagging them to the hull.  We cut the planks as before, but now we had the challenge of getting all 90 planks on the boat and bagged before the epoxy kicked off.  We ended up pre coating all the planks with epoxy, then coating the hull, and finally coating the hull again with thickend microspheres.  We tacked each plank with a few staples and rushed to get the plastic bag over everything.  What you are seeing in the above picture is the Dum Dum detail.  The Dum Dum is the yellow stuff that sticks the plastic to the boat.  A pipe goes from the vacuum into the bag and sucks the bag down to the planking.  As air leaves the bag  the atomsphere fills the pressure void by distributing pressure to the planking.

This is the end result, a nice, tidy vacuum bag.

Saturday, May 30, 2009

How to Comment

Lara wrote a tutorial on her blog about how to leave comments on this site.  Click here to read it! I like hearing from you and would be happy to walk you through the steps on the phone. Just give me a call! 

The 4th layer of veneer is currently in the works. Hopefully I'll have time tomorrow to sit down and tell you about it.

Cheers.  

Sunday, May 10, 2009

Strip Planking

Wow!  It has been a long time since the last post.  Lara and I have been busy moving into our new place and I have been sailing on Saturdays.  I'm going to atempt to get up to date with this post; we'll see how it goes.  The photos will hopefully illustrate some of the processes and terms you may not understand. Terms marked with a * also have definitions at the bottom of the post. As always, if you have questions feel free to leave a comment.

I left off with the stringers, keelson, and sheer clamp in place so now we were ready for the strip planking.  We used 5/8" X 1 1/2" Alaskan Yellow Cedar that came in 16 to 20 foot lengths.  The first task was to scarf up* the material into the 42 foot lengths that we needed (see photos below).  In two days I glued up 130 planks at 50 feet long which was quite the production.  With the scarf jig* (pictured below) the process was not as gruling as it could have been.
The shop's method of planking was much different than what I was familiar with.  For the most part, it seems that builders use bead and cove* material and glue each plank to each other.  In our method the planking was only glued together at the stringers, clamp and keelson; the rest was glued and screwed to the bulkheads with no glue in between the planks. I mention this as an interesting fact because the "bead and cove" method ensures a tight seal between the boards, whereas this method leaves gaps or "seams" that are later filled with glue.

 
50 of 100 glued up planks.

  
This is a scarf joint. 

 
This is a scarf jig.

When the planking was finished, we came back and filled the seams with the thickened epoxy.  This was a huge time saver in both clean up of the dripping goo and and in the amount of time it would have taken to glue each plank to eachother.  We were able to get away with this method because there is a lot of athwartship* strength (bulkheads, lockers, and such) in the design of this boat.  This method would not work on tight scantlings (meaning a boat that is built lightly or with less robust materials) or with a design with few bulkheads.

Once the boat was all shmooed up (shmoo=glue) it was time to grind the hull and fair it out. To fair a hull is not only to make it smooth, but also to remove the high and low points, making a perfect curve.  Here too we diverged from shop norms.  We only did a rough fairing and filled the low spots with thickened epoxy.  We did this because the silica (a high density/high strength thickening agent) in the glue is so difficulte to grind off, and the cedar so easy, that its pretty hard to do a perfect job.  To get around this we are going to do the final fairing on the last layer of veneer cold molded to the boat (there will be 4 layers of veneer on top of the strip planking).  This takes a lot less effort because the thickening agent in this last batch of epoxy is made of low density micro balloons (sounds like fun, huh!).  Micro-balloons have a hardness much closer to cedar than silica, and thus, its easier to achieve a fair surface. 


The photo above shows the strip planks of the boat.  A plank is a piece of wood that runs from stern to bow. The planks you see in this picture comprise the bottom-most layer of the composite structure--meaning that this is the foundation for 4 more layers of wood that will be glued on top.  

Definitions:
Scarf: to glue two lengths of wood together--this makes two short boards into one long board.

Scarf jig: Not a dance, contrary to popular belief.  A jig is something we build to fit onto a power tool so that it can perform a more specific function, requiring less thought and yielding a higher production. In this case, a jig is fitted to a miter-saw, allowing us to cut lengths of wood at exactly the same angle each time. These are later glued together or "scarfed"--which is why it is called a "scarf jig."


Bead and cove: a "ball and socket" joint--just like your hips!

Athwartship: From port to starboard--or the entire width of the ship.

Thursday, April 23, 2009

Stem, Keelson, Clamp, and Stringers

The following may seem a bit of a scramble, since I'm trying to catch up with the work that's been done--so bear with me.  When I'm all caught up I will hopefully sound less frantic. For anyone who is confused about all these boat building terms, you will be happy to hear that I am planning on making some additions to the blog, i.e. an anatomical drawing of a boat with all its parts labeled and defined, as well as some links to resources that might help you make sense of all this jargon. And, if i can find a good one, I hope to include a maritime dictionary. If you have questions, please feel free to post a comment. I'd also love to hear your feedback about the format, for example: should I define terms as I go, or make a list of definitions at the end of each post? I check for comments more than I care to admit (like 6 times a day...).  So, on with it then!


PICT0070
This is the stem and forward portion of the keelson.

To set the scene: We are now ready to start assembling the stem, keelson and the permanent longitudinal members of the boat (that sounds really fancy). In the last post, we had just plumbed the molds and placed them on their centerline. When that was finished, we glued up the stem and keelson (see photo above).  The stem is made of 6 pieces of 3/8" mahogany and the keelson is made of 3 pieces of 3/4". The stem was made of thinner material to accommodate the severe curve. The after portion of the keelson was made of thicker material because it only had a slight curve. (We did not face the boards during milling because they were to be bent around a mold). To get the mold lines for the stem and keelson we transfered the water-line lengths and station heights of the profile line on sheets of MDF, then fared a line between the points. (We didn't do this directly on the loft floor because it was being used for other things).  The photograph below illustrates this process.


sc000bb0b4
This is a bird's eye view of the stem and keelson glue-up (as described in the proceeding paragraph). The dotted line represents the mold deduction line. The solid line is the profile line, taken from the lofting. This is basically a drawing of the first photo. Photo of the clamping blocks can be seen below. (Click on the picture for larger view.)

From this profile line we deducted 4 1/8" and drew a parallel line. This line is the mold line and from it, we put our clamping blocks along the curve. This initial glue-up is only 2 1/4"; the finished thickness will be added later on the boat with strip-planking and 4 layers of diagonal veneer.  From there, we notched the molds and bulkheads in preparation for the stem and keelson, which were then glued to the bulkheads.  


PICT0068
This is the aft portion of the keelson glue-up. 
Notice the clamping blocks to hold the glue-up in place.

After the keelson and stem were in, we located the stringers, notched them out in the molds and bulkheads, and glued them together on the boat.  From this point, all the permanent members were fared with the molds and we were on to the sheer clamp

We scarfed up the stock for the sheer clamp and notched out its location on the molds and bulkheads, then glued it together on the boat and glued it to the bulkheads.  The bottom edge of the sheer clamp (because the boat is upside down) is the location of the deck line. At this point, I'm not sure about deck beam layouts, but I do know that the deck will rest on the sheer clamp.  


longitudinals1


We're really close to being caught up now. Once all the permanent members are fared we're ready for strip-planking. By the next post, I'll be in real-time again. We hope to have the strip-planking finished by Tuesday or Wedensday, so you can look forward to that.  Cheers.

Wednesday, April 22, 2009

Early Stages

When I started this project, we were finishing the molds. Right away, I discovered an amazing way to lift body sections off of the loft floor.  Instead of using pick up sticks and bundle batons, rip a 3/4 x 3/4 inch piece of plastic and screw the baton onto the body plan at your particular station.  Then, place your mold stock on top and cut it with a router using a flush cutting bit.  This eliminates any distortion that may occur when moving pick up sticks from the loft floor to the stock--and its a hell of a lot faster. The only disadvantage of doing it this way is that all of your molds and bulkheads will be cut square. To deal with square corners, we fare them with 36 grit sand paper on a long board.  The two ends of the longboard will bear on the leading edge of the molds and the sandpaper will cut the bevel into the molds.  This boat is strip-planked with four layers of cedar veneer so we only needed to shape the transom, bulkheads, and stem. 


The boat with stringers, stem, keelson and clamp.

For this project, we have MDF molds (which are really nice because they don't warp), 1/2" plywood bulkheads (well, 2 are 3/4") and 1 1/2" plywood transom.  For heavy faring, we use a 4 1/2" grinder with 80 grit sandpaper. This method seems to be the ultimate time saver, as it can take days to complete when your block plane becomes dull every 20 minutes. 

A sidenote on scarfing plywood:
Two words: Power planer and 9" angle grinder. Don't waste your block plane iron on hellacious plywood. Finish the scarf off with the grinder. 

Wednesday, April 1, 2009

About this blog

My name is Joe Green and this is a blog about boatbuilding. 


Me.

Specifically, this blog is about my current projects; but I also hope to illustrate the difference between what is taught in school and what is practiced in the shop. The title of the blog was inspired by the "get it done" attitude of shop work, which seems, at times, to require "running with a router." The pace of a large, professional boat shop is distinctly different than that of the quaint operations in which I've been working. 


I was educated at the Northwest School of Wooden Boatbuilding in Port Hadlock, WA and apprenticed for 6 months in The Netherlands building 17th Century Dutch fishing boats (above photo). When I moved to Portland, OR, I worked  briefly as a carpenter before continuing my work as a boat builder.